
Hello all!
So, about actually putting up a helpful article here…high time I did that rather than leave this thing up as a name billboard.
I got messaged by a fellow back in January right after New Year’s about woes he was having about a hardware error of a device I owned. Apparently he stumbled upon a forum post and found my page here (don’t know how that came about). Either way my solution was very…um, how to put this; unorthodox and not straightforward. I learned two things that’s prompting me to make this entry:
1. As “Apollo 13ish” as my method was and its works, not everyone may get what to do from my outline of steps.
2. This problem still occurs even after a whole year that I came across my hotfix.
With that I’ve making a more straightforward set of instructions that any average Joe should be able to follow. And as such, Yorina and Dyma are here to help walk you through this.

Artwork courtesy C. Weinman.
Yes, I use aliens for tech support; sue me.
So! Let’s get started.
Important Update – February 15, 2022
As of December 31st, 2020, I no longer provide customized support or answer specific questions for troubleshooting. I no longer own these drives, so I don’t have a platform to experiment to try to resolve the issue for you. I do apologize for the inconvenience, but they’ve lived their life out and one quit working entirely, nearly resulting in total data loss. I hope whatever is now in this 7-year-old article can help you. If there’s something general that got missed, I’ll do my best to answer, and I’ll always be open to feedback/comments. I just don’t have a testbed to help you solve complicated inquiries anymore.
There is a small bit from the official WD manual that I’ll update this article with in the near future, which is deemed their” solution” for Code 004.
–
WD My Cloud Data Recovery: Data Volume Failed to Mount: Code 004
First! Story time as to how this problem came about.
It was November 2013. WD had just released their “My Cloud” line a few months ago and I was on the market for an addition to my family’s single MD My Book World. I plucked a 3TB off Amazon and promptly set it up Thanksgiving morning. All seemed well I started to offload data onto the drive on the following days.
Come the last day in November at 2:30AM. Don’t know what exactly happened but we had a power failure. The drive wasn’t on a UPS and the power came back on a minute later. When morning came I went to continue copying things onto the drive when it told me that it couldn’t find the drive. Wasn’t new; thought it was being finnicky as the My World as that drive would give that message when you copied stuff for a long period of time. My home baked solution? Reboot the drive. So I walked over to do so and found;
The Red Light.
Worried was an understatement. Immediately I knew something was wrong and looked up the error. As I accessed the dash and saw what the manual had to say I realized this was quite serious. What had me worried was that most of the data I had copied was non-replaceable; and I had already deleted it off the origin drive. So off to support I went.
Long story short with my chat to support and from the manual, the drive was returning a Code 004 error in the dashboard. “Data Volume Failed to Mount”. Meaning something was wrong with the data volume when the drive was rebooting and it was unable to link and show it on the network. Support assured me that if I could access the Dashboard that the drive wasn’t physically bad; rather that it was a firmware issue. They put in a support ticket in for a replacement drive.
While that was all good and dandy I still had my data on that drive. And I wasn’t going to pay someone $600 to get it off. I decided to fish around on the drive myself and see if I could rescue my “stranded data” with what I knew from CSCI and the old days of dial-up bulletin boards before the Internet existed.
I had visited the WD Community forums for help (you can see my plea for help here ) but as this drive was relatively new there was barely any information on what even to do to fix it.
You see there was a “scorched earth” solution to fix the drive; but this would result in the loss of your data. Factory wiping the drive. This was not an option.
I took a crash course in SSH and navigating Linux via command prompts, drinking lots of coffee and soda for three days straight and staring back at printed logs. But from all that I read and some obscure Ubuntu forum I finally came up with a solution to gain access.
Yorina: Please! Is this whole post a story or are we going to actually tell people how to do this?
All right, fine! Sheesh!
“Ayaaa, one more thing!” (Jackie Chan reference for those of you who don’t recognize that). Not responsible for the screw-up of your drive if you make a mistake. This is under the assumption that the situation was closely identical (will go into details down later).
You also permanently mess up the firmware on this drive when you do this. Its imperative if not highly recommended to factory reset your drive after you finish rescuing your data. There! Girls?
What You Need:
Greetings, I’m Yorina Athanias. And this is my companion and colleague Dyma. We’ll be helping you commence firmware repairs on the hardware storage device known as the WD My Cloud.
Wha…too formal? I’m speaking to the public! Mother said to always be formal when doing that!
…..
Fine. Sorry about Dyma. She doesn’t really speak a whole lot.
So, what you’ll need to make this procedure work:
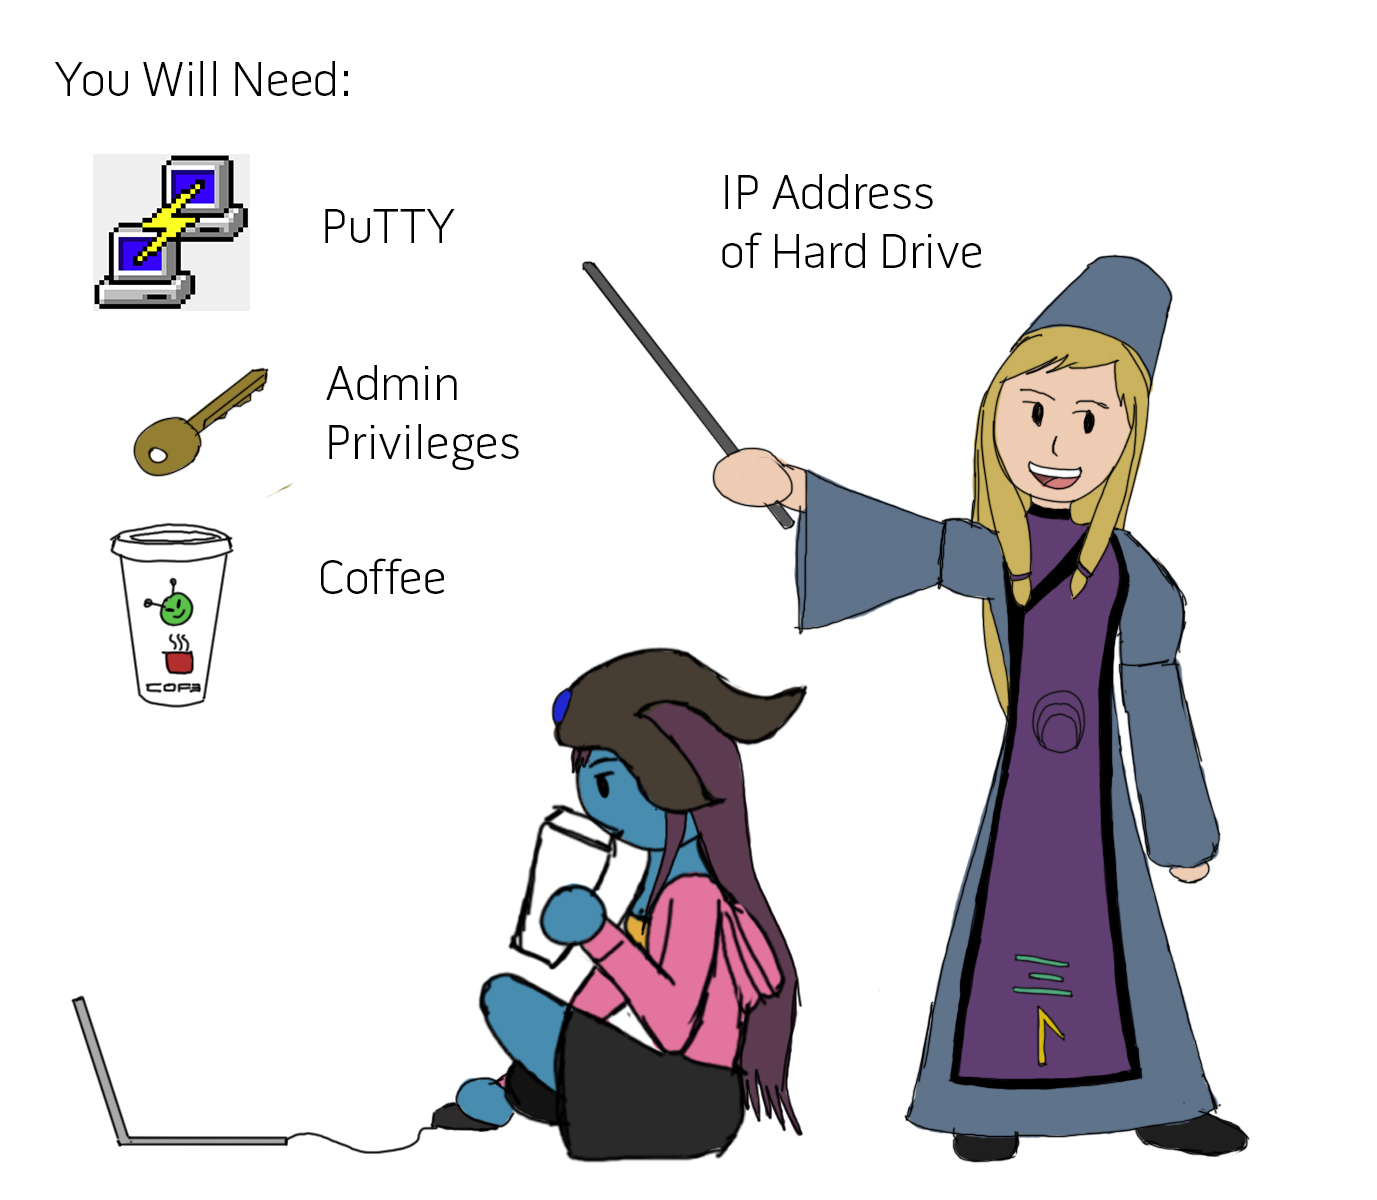
- PuTTY: This is a utility that will allow you to make the connection to the drive. You can download it here
- Admin Privileges: This came up in another software, but its suffice to say that Windows may block the connect. Make sure you’re an admin and you have the necessary privileges.
- IP Address of Hard Drive: Remember the days of old when you would dial across ancient phone lines via a number address? You’ll be doing so again. Chances are you know this address already; if not, it’s easily accessible from the Network tab in Windows Explorer. (Alternatively, Dyma suggests that you can get it from the address bar of the browser while accessing the drive’s Dashboard)
- SSH Enabled: This entire procedure depends on SSH being enabled on your drive. If you can ‘t access the Dashboard to turn on SSH, as well-learned as we are we can’t help you. Otherwise, go turn it on. (See below)
- Coffee: Optional. Just to help and keep you calm, as you can see Dyma doing.
STEP 1: Establish Connection to Drive
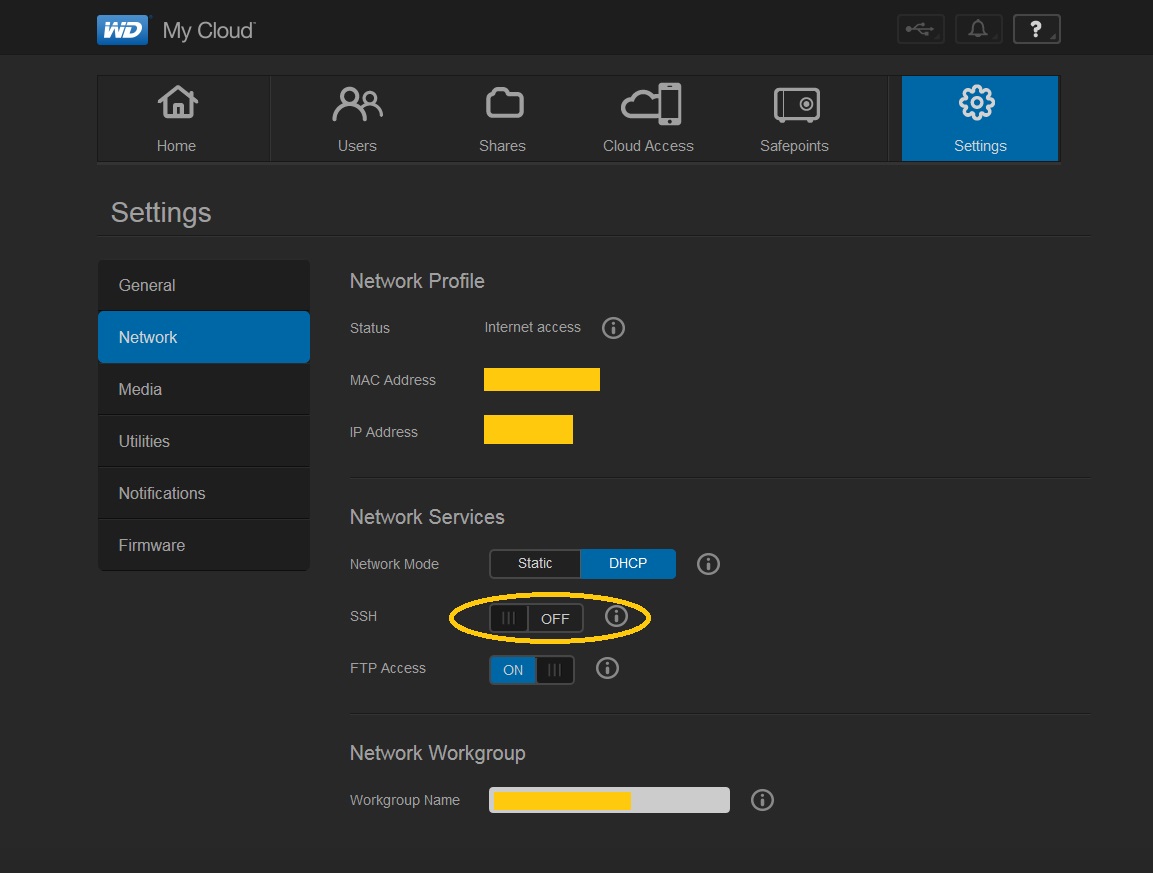
Subsection A: Enabling SSH
Enabling SSH is simple. Generally its not on by default as your “technically inclined” portions of Terran culture doesn’t want simpletons messing up the framework. Simply go to Settings in the Dashboard UI then Network on the left. Turn it on as so:
Subsction B: Connecting to the drive via PuTTY
Open PuTTY after installation. You’ll get a window like this:
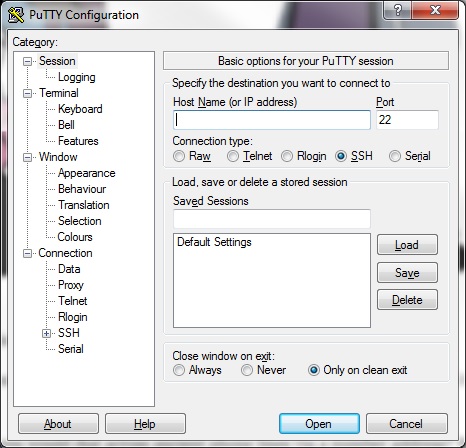
PuTTY Configuration Screen
Enter the address of your hard drive in the Host Name field. Port is fine. Click open.
You’ll get a message that the host you’re trying to connect isn’t a verified host, asking if you trust your connection destination and if PuTTY should remember this. Click Yes and you’re brought to a command prompt.
Immediately you’re prompted for a username/password. Now if you listened to us and left it at default, this is the default combination:
Username: root
Password: welc0me (the “O” is a zero)
If all goes well, a welcome greeting about the drive’s OS will be spat back out to you with the prompt patiently awaiting your input. At this point, you should feel just as David Levision did after he clapped his hands together when his Apple laptop logged into the alien Mothership’s mainframe.
OW! Fine, no more movie references.
Step 2: Ensure Partitions are intact
As a failsafe to make sure this will work, your partitions need to be intact. Enter this line on the command prompt:
# parted -l (This is the letter “L” in lowercase.)
If things are still clicking away as they should, you’ll get something similar to what’s below:
Number  Start   End     Size    File system     Name     Flags
 3      15.7MB  528MB   513MB   linux-swap(v1)  primary
 1      528MB   2576MB  2048MB  ext3            primary  raid
 2      2576MB  4624MB  2048MB  ext3            primary  raid
 5      4624MB  4724MB  99.6MB                  primary
 6      4724MB  4824MB  101MB                   primary
 7      4824MB  4826MB  1049kB                  primary
 8      4826MB  4828MB  2097kB                  primary
 4      4828MB  3001GB  2996GB  ext4            primary
This will vary as they probably make the drives a different way or arrange it due to size. But in either way there will be a partition that’s the size of the entire drive (3TB in this case). For this example, number 4 is the main partition with a file system of ext4. Keep that on hand for a following step.
Step 3: Get Drive’s File System and Block Backups
Now that we’ve located (well, you located) the drive’s main partition number and filetype, time to pull its data. Enter this:
# mke2fs -n /dev/sda4
From what Dyma found in Janeil’s notes, the number on the end refers to the partition number. If the main partition is a different number, change the number accordingly. (4 was the default on the 2013 drive)
You’ll get back some file system information on the drive partition and some other information. But most importantly, there will be a section with a bunch of numbers labeled “Superblock backup locations”. This is what we’re after. Write down some of these numbers as we go to the next step-
Ah ah ah! We’ll explain later. This is good news if you have backup locations. Onwards!
Step 4: Restoring Drive Information From Superblock Backup
Now that we have locations of a backup, its time to set things right. Type out this command:
e2fsck -b blocknumber /dev/sda4
“blocknumber” is a placeholder for the actual block number you wrote down a minute ago. Type this in there instead.
The drive’s OS will start looking for bad blocks and ask if you’d like to write over the bad blocks with the intact data from the backup. Yes to rewrite, yes to ignore.
Then it’ll begin some diagnostics. It will go through 5 passes of various tests. If something is out of the ordinary, just answer yes. It’s just trying to re-build the partition and file count info.
This may take about 20 minutes depending on how much data you have on the drive. When it’s complete you’ll either get a summary or a “Killed” message with a return to the prompt.
Step 5: Rebuilding and Rebooting
Time to see if this actually worked. As with all changes, you must start afresh. Enter this command:
# reboot
The drive will restart and start to reconstruct its library as if you soft rebooted it from the Dashboard. This will take some time (about 30 minutes or more) so don’t panic if you don’t see anything right away.
Step 6: Rescue Your Data
If all went according to plan, your data should show up right where you left them. Now sadly your drive’s been modded so fix the data in an unconventional way, so you lose most of the Dashboard’s information on the drive such as hard drive space and the like. Copy off your data and prepare to start back from square one.
Optional: Step 7: Reformat the Drive to Factory Condition
Once all your data has been successfully copied off and lifeboat-ed, time to reset the drive. Go back to the dashboard and go to Settings, Utilities and Full Restore. Wave goodbye as it restarts and wipes the drive clean to factory settings.
As this its not technically proven to fix your drive back to its old state after this, its a good idea to do so if you have to send the drive back in for warranty.
And there you have it. The hodge-podge procedure born out a tiny rural community on how to rescue your files of a WD My Cloud in case it gets the red light and code 004.
For most of you, the post stops here. But if you’re tech savvy and want to know what went wrong, Dyma will be glad to explain what we think went wrong and how this worked. Hey! *wave onto screen*
Ah yes. Thank you, Yorina. Hope the post was helpful guys who needed help. Special shoutout to dazippy2 for letting me know that my method was still useful and making it clear I needed a step-by-step version of this.
Footnote 2017
I want to say thank you to everyone who’s given comments, thanks and just simply finding my tutorial useful on my site. This is the most trafficked web page on my site (and of all time, too) and I’m glad that I’m able to help you recover your data without it being lost.
If you’ve found this tutorial useful and would like to show your appreciation, feel free to drop two bits for coffee via Paypal or support my Patreon. Donations help to keep the lights on at the site, along with helping me get more content to post!
![]()
![]()
What Went Wrong? Analysis
Greetings, I’m Dyma. *polite bow* We present technical data!
The drive malfunctioned when power was lost.We assume data was written halfway during the drive’s power less and resulted in a corrupt block that prevented the partition from mounting properly.
This procedure involved a temporary but working fix to restore a backup of block structure in case of such an event. Superblocks are the schematics for the drive’s information; partition size, file count, etc.
The exact error that led Janeil to this solution was this response line when attempting to generally fix the file system:
e2fsck: Attempt to read block from filesystem resulted in short read while trying to open /dev/sda4
Could this be a zero-length partition?
Short reads occur when the filesystem block is corrupt. The partition physically existed but the filesystem spoke otherwise. The method you used was a Linux method to restore the corrupted filesystem of a Linux OS drive adapted for use on the WD My Cloud.
As you noticed when getting the superblock backup locations, there are several that they’re stored in. This is due to the fact that one block can get corrupt, so for safety measures more than one exists. Theoretically if one of these locations were bad, you can type in an alternative address to pull the backup information from.
In final, never unplug the drive without shutting it down from the Dashboard. Also keep the drive connected to a UPS; if the power goes out and it will be out for a good portion of time, immediately get access and shut the drive off. Lastly as a given, always keep a backup of your data on hand.
Hi
I had the same problem like you. For me it was a broken file system which prevented the system to mount the drive. I fixed it with sudo fsck.ext4 -v /dev/sd4 and hdd tests which followed.
Thanks for the input! I had tried to use fsck command, but as listed in the last part, it’d just not work because of a “short-read error”. Glad to hear it worked for you, though.
Martin, thanks a lot. This fixed my disk. Below is what happened and then rebooted the disk to reinitialize.
WDMyCloud:~# sudo fsck.ext4 -V /dev/sda4
e2fsck 1.42.5 (29-Jul-2012)
Using EXT2FS Library version 1.42.5, 29-Jul-2012
WDMyCloud:~# sudo fsck.ext4 -v /dev/sda4
e2fsck 1.42.5 (29-Jul-2012)
One or more block group descriptor checksums are invalid. Fix? yes
Group descriptor 19203 checksum is 0x871b, should be 0x48c4. FIXED.
/dev/sda4 contains a file system with errors, check forced.
Pass 1: Checking inodes, blocks, and sizes
Pass 2: Checking directory structure
Pass 3: Checking directory connectivity
Pass 4: Checking reference counts
Pass 5: Checking group summary information
Free blocks count wrong for group #19512 (756, counted=757).
Fix? yes
Free blocks count wrong (374622222, counted=374622109).
Fix? yes
Free inodes count wrong (182254819, counted=182254806).
Fix? yes
/dev/sda4: ***** FILE SYSTEM WAS MODIFIED *****
598826 inodes used (0.33%, out of 182853632)
12158 non-contiguous files (2.0%)
330 non-contiguous directories (0.1%)
# of inodes with ind/dind/tind blocks: 0/0/0
Extent depth histogram: 597357/1461
356765795 blocks used (48.78%, out of 731387904)
0 bad blocks
65 large files
577634 regular files
21183 directories
0 character device files
0 block device files
0 fifos
7 links
0 symbolic links (0 fast symbolic links)
0 sockets
————
598824 files
Thanks so much. I got home from work and my stomach dropped, red LED.
Followed your guide, rebooted and everything is back to working. Thanks a ton.
Hey, glad to hear that my guide has helped you. Do appreciate the feedback!
How do you copy all your data off in step 6? After rebooting in step 5 I am able log via putty and also via the web user interface. I can even see my shares when accessing the drive via Windows. I cannot access the shares so I am not able to access any of the data within those shares. I logged into the drive via WinSCP but I can’t find any of my data.
When I copied my data, I just accessed the drive through Windows Explorer over my LAN network and accessed the root folders (copied the entire Public folder). I don’t know about WinSCP but I didn’t use anything extraordinary or special to get the files.
After the #reboot command, go to the web interface and do a reboot of the drive from there, then try accessing it again. I have a feeling that it may be an IP address related issue.
Awsome !! work like a charm
You’re welcome! I’m glad I was able to help you out.
So this solution helped me out immensely and I was able to recover my data!
However the factory restore has not worked (tried many times). The wdmycloud says it has 1.78 GB total. After I tried parted -l again It looks like the file system of ext4 is missing from my main partition #4. Any clues of resources I might look into to fix this?
Thanks again!
Hi Kim,
Not sure why this happens, I’ve heard some feedback that different things seem to happen on the newer drives now when people use this technique. Don’t know why a complete partition would go missing!
I do know the reason the small space is showing (1.78GB) is that the drive is running on the OS partition of the drive. That’s a side-effect of my technique to get the files.
Is your drive still under warranty? It may be prudent to try to return it and get a new one if it is. I briefly poked my head at some solutions on the WD forum; while certain solutions may or may not fix the issue, those particular procedures void the warranty of the product as you need to physically open the drive. So above all, I would recommend to try to get it RMA’d first (Just mention the error 004 with the partition and say you factory reset it.)
If it’s out of warranty and that’s not a concern to you and you’re up to the challenge, you can give it a crack. I have not tried these solutions and have zero experience with them, so I cannot speak for any success/failures or assist with any stuff that may arise.
https://community.wd.com/t/guide-how-to-unbrick-your-2tb-3tb-4tb-my-cloud/93336
Hope that helps! Let me know if you have any other questions.
Thanks for sharing some light from your candle of knowledge, as I wish I could share that per your simple steps, I was unable to continue after step 2, as one of my drives failed.
If by any chance you have any potential azimuths to assist my excursion from its current crossroad location, it would be greatly appreciated, as this has been difficult to to this point.
Hi HD,
I’ll try but can’t give you a guarantee if its something outside the scope of the instructions. Can you tell me where you are unable to continue after Step 2? What was the last successful step?
Good afternoon & thanks for the prompt reply
Step 2 was a go & here is how Step 3 plays out
once I type in this CMD [mke2fs -n /dev/sda4], the screen displays the following, regardless if I type drives 1 through 4 at the end of the CMD
StorageDuo:~# mke2fs -n /dev/sda4
mke2fs 1.41.12 (17-May-2010)
/dev/sda4 is apparently in use by the system; will not make a filesystem here!
Thoughts?
Hi HD,
Three things can be in play here that I can think of.
1. sda4 is no longer the main drive partition, it would seem. You will need to tell it to look for a different partition instead. After doing “parted -l”, copy and paste the results so I can see.
2. From a Google search, that error is given to some users when the drive is mounted though not functioning. It is entirely possible that something else is wrong that is similar to error 004 but didn’t “play out” completely so that it doesn’t fix with these steps. If this is the case, I can’t help you beyond speculation of what you might be able to do.
3. A user was able to resolve his issue entirely by using “sudo fsck.ext4 -v /dev/sda4” without all these additional steps. This may fix your issue as well.
Hope these suggestions helped.
Hi Janiel,
i have the same error, but my device is “My Book Live DUO” which got 2 TB HDDs. those HDD ARE NOT in Mirror.
i tried the steps you mentioned here but i am not able to pass step 3.
below is the output of the command.
TSCAISTG03:~# parted -l
Model: ATA WDC WD20EURS-63S (scsi)
Disk /dev/sda: 2000GB
Sector size (logical/physical): 512B/512B
Partition Table: gpt
Number Start End Size File system Name Flags
3 15.7MB 528MB 513MB linux-swap(v1) primary raid
1 528MB 2576MB 2048MB ext3 primary raid
2 2576MB 4624MB 2048MB ext3 primary raid
4 4624MB 2000GB 1996GB primary raid
Model: ATA WDC WD20EURS-63S (scsi)
Disk /dev/sdb: 2000GB
Sector size (logical/physical): 512B/512B
Partition Table: gpt
Number Start End Size File system Name Flags
3 15.7MB 528MB 513MB linux-swap(v1) primary raid
1 528MB 2576MB 2048MB ext3 primary raid
2 2576MB 4624MB 2048MB ext3 primary raid
4 4624MB 2000GB 1996GB primary raid
Model: Unknown (unknown)
Disk /dev/md0: 2048MB
Sector size (logical/physical): 512B/512B
Partition Table: loop
Number Start End Size File system Flags
1 0.00B 2048MB 2048MB ext3
Model: Unknown (unknown)
Disk /dev/md2: 513MB
Sector size (logical/physical): 512B/512B
Partition Table: loop
Number Start End Size File system Flags
1 0.00B 513MB 513MB linux-swap(v1)
Error: partition length of 7795994592 sectors exceeds the
loop-partition-table-imposed maximum of 0
Hi Wael,
I apologize that I can’t come up with a surefire solution, but it would appear that My Book Duo has a different drive formatting system versus the My Cloud. It could be age, it could be because the drives are 2TB (which I think is what the issue is). I can only guess and theorize with what I say at this point as I have no experience with that model, so take it with a grain of salt and not surefire gospel.
The error you gave is related to trying to fix a drive with a certain toolset, but that toolset only applies to a certain formatting table, according to here: http://askubuntu.com/questions/84538/trouble-creating-3tb-ext4-partition-due-to-msdos-partition-table-imposed-error
I’m fairly certain this error is because your 2TB drives were formatted differently. I’m not familiar or versed in the command lines for that partition setup, but my method may not appear to work as it’s different.
You can search around the Internet to see what is the procedure to getting backup block locations for your partition, and what would be the command line to restore it (It may be similar). Aside from that, I apologize if I can’t help you beyond that.
Hi Wael,
Try this command too, it may just work. It’s a long shot but may get the job done:
sudo fsck.ext4 -v /dev/sda4
Thanks a lot Janeil for your prompt response. i tried this with no luck.
thanks anyways for your help.
Hi Janeil,
first of all: thanks a lot for this brilliant tutorial. It is very easy to follow and nicely written.
Everything worked perfectly as you explained it only in Step 4 after I entered
“e2fsck -b blocknumber /dev/sda4”
I don’t get the option to choose if a want to write over bad blocks.
After a brief pause I get the following line:
/dev/sda4 was not cleanly unmounted, check forced.
then it starts the 5 passes routine and I get a “Killed” int the end.
After a reboot the data is still inaccassible.
I tried 3 different storage blocks so far.
Any thoughts?
Hi Nic,
Thanks for your comment, I’m glad that you appreciate this tutorial!
From a quick Google search, the message you’re getting about cleanly unmounted is a simple warning message telling you that the drive had an issue, and that it’ll go ahead and fix. This is the first time I’m hearing a WD drive do this but from several Linux forums most users regard it as a warning message; it merely means something didn’t go right with your drive in some manner when booted up (Kind of like when you physically power off a PC instead of shutting it down, then it tells you when you boot up that “This computer wasn’t shut down correctly”).
For the Killed message, it has come to light to me a couple of months ago when you now get “Killed” message on a newer model of the drive, it means that the drive didn’t actually finish its restoration process; the primary culprit of this is that its out of memory and stops halfway. This user supplemented my tutorial and made this walkthrough of what he did here: https://community.wd.com/t/solid-red-led-light-cannot-mount-file-system/178596/6 . I never tried any of this but you’re welcome to try it to see if it fixes your problem.
I believe that the drive ran out of memory and auto-aborts, giving you the Killed message. Try the link above; I hope it solves your problem!
-Janeil
Hey,
thanks for the advice.
Seemed to work. But it ends now like that:
WDMyCloud:/media/myusb# e2fsck -C0 -b 884736 /dev/sda4
e2fsck 1.42.5 (29-Jul-2012)
/dev/sda4 was not cleanly unmounted, check forced.
Pass 1: Checking inodes, blocks, and sizes
Pass 2: Checking directory structure
Pass 3: Checking directory connectivity
Pass 4: Checking reference counts
Pass 5: Checking group summary information
Signal (11) SIGSEGV si_code=SEGV_MAPERR fault addr=0x8
After I googled the error I got various reasons for it. from hardware-error to not enough memory.
But as a not-really-into-this-stuff person I am not able to come to a conclusion.
I added additional swapspace to make sure it has nothing to do with less space.
So maybe my last question: Do you have any idea where this may hint?
Would you say the hardware is damaged? Or is there another ace in your sleeve?
Thanks again for the help. It took me really far. but in the end I always crashed hard 🙂
Hi Nic,
It would seem that there may be something wrong with the drive, but let’s try to rule out a bug first over hardware failure.
From what I read, that specific error does say hardware failure, but it also kicks back an “incompute” error on the Linux OS in certain cases. The error in general without the code can also signify a bad backup.
Next step? As simple as it sounds, try backing up from one or two different superblock locations; it might just be that the specific superblock that you’re pulling data from may be damaged.
Can’t think of anything else at this time. I’m glad my advice helped you a bit and you did get somewhere! Hope this helps!
Hi Janeil. Great tutorial. I’m using an older My Book which stores the main volume using XFS file system. Do you have a work around for that as using the command line in Step 4 I get an error message as I’m not addressing an ext2 file system.
Appreciate your efforts
Hi Graeme,
Sorry for the delay, I’ve been nose-deep in something this last month.
That sounds about right, didn’t expect that to work with an XFS system. I don’t know if there’s a direct workaround, I’ll look into it and let you know if I come up with anything.
Hello, why is it that the password in putty does not work? After I type in root, a password prompt comes up. When I type the password nothing actually types. However, i still type the password and then hit enter and then it says denied. What am I doing wrong?
Hi Ebbie,
On newer models and firmware of the WD drive, the login method is blocked by another password; Long story short the system password is overwritten when the newer OS is installed. I’m looking into this and will update you.
Hi Ebbie,
I think I might have a solution. Do you happen to know your firmware version of the drive? Is it 2.xxx or 4.xxx?
Hi Janeil, I am using Firmware version: 04.05.00-315
Hi Ebbie,
I’ve asked around a bit, and the firmware you have should be the exact same method for what my tutorial requires. Try to make sure you’re typing it correctly, as even not capitalizing the wrong letter will make it go off. If it was firmare 2.xx, the password is set by the user and you use this instead. In theory everything says that root/welc0me works, so I’m not sure what could be going on beyond that.
Janeil,
Thank you for taking the time to put this up. I had a base backup but did not have a few new items that were add in the last few months. I’m currently copying then off now. I had the error code 4 and I followed your steps. Here is a copy of the messages (below) while I was working on the drive.
After I get done with the copy, I will be formatting the drive to see if it still good. My warranty was up last year.
Thanks again!
————-
login as: root
[email protected].0.0’s password:
Linux SnowCloud 3.2.26 #1 SMP Thu Jul 9 11:14:15 PDT 2015 wd-2.4-rel armv7l
The programs included with the Debian GNU/Linux system are free software;
the exact distribution terms for each program are described in the
individual files in /usr/share/doc/*/copyright.
Debian GNU/Linux comes with ABSOLUTELY NO WARRANTY, to the extent
permitted by applicable law.
Last login: Tue May 30 00:36:14 2017 from 192.168.0.0
SnowCloud:~# parted -l
Model: ATA WDC WD60EFRX-68M (scsi)
Disk /dev/sda: 6001GB
Sector size (logical/physical): 512B/4096B
Partition Table: gpt
Number Start End Size File system Name Flags
3 15.7MB 528MB 513MB linux-swap(v1) primary
1 528MB 2576MB 2048MB ext3 primary raid
2 2576MB 4624MB 2048MB ext3 primary raid
5 4624MB 4724MB 99.6MB primary
6 4724MB 4824MB 101MB primary
7 4824MB 4826MB 1049kB primary
8 4826MB 4828MB 2097kB primary
4 4828MB 6001GB 5996GB ext4 primary
Model: Linux Software RAID Array (md)
Disk /dev/md1: 2048MB
Sector size (logical/physical): 512B/4096B
Partition Table: loop
Number Start End Size File system Flags
1 0.00B 2048MB 2048MB ext3
SnowCloud:~# mke2fs -n /dev/sda4
mke2fs 1.42.5 (29-Jul-2012)
Filesystem label=
OS type: Linux
Block size=4096 (log=2)
Fragment size=4096 (log=2)
Stride=0 blocks, Stripe width=0 blocks
182996992 inodes, 1463951872 blocks
73197593 blocks (5.00%) reserved for the super user
First data block=0
Maximum filesystem blocks=0
44677 block groups
32768 blocks per group, 32768 fragments per group
4096 inodes per group
Superblock backups stored on blocks:
32768, 98304, 163840, 229376, 294912, 819200, 884736, 1605632, 2654208,
4096000, 7962624, 11239424, 20480000, 23887872, 71663616, 78675968,
102400000, 214990848, 512000000, 550731776, 644972544
SnowCloud:~# e2fsck -b 32468 /dev/sda4
e2fsck 1.42.5 (29-Jul-2012)
e2fsck: Bad magic number in super-block while trying to open /dev/sda4
The superblock could not be read or does not describe a correct ext2
filesystem. If the device is valid and it really contains an ext2
filesystem (and not swap or ufs or something else), then the superblock
is corrupt, and you might try running e2fsck with an alternate superblock:
e2fsck -b 8193
SnowCloud:~# e2fsck -b 32768 /sev/sda4
e2fsck 1.42.5 (29-Jul-2012)
e2fsck: No such file or directory while trying to open /sev/sda4
Possibly non-existent device?
SnowCloud:~# e2fsck -b 98304 /dev/sda4
e2fsck 1.42.5 (29-Jul-2012)
Superblock needs_recovery flag is clear, but journal has data.
Recovery flag not set in backup superblock, so running journal anyway.
/dev/sda4: recovering journal
Error reading block 731938993 (Attempt to read block from filesystem resulted in short read). Igno re error? yes
Force rewrite? yes
Error writing block 731938993 (Attempt to write block to filesystem resulted in short write). Ignore error? yes
Pass 1: Checking inodes, blocks, and sizes
Inode 68157452, i_blocks is 65312, should be 32. Fix? yes
Deleted inode 68159604 has zero dtime. Fix? yes
Inodes that were part of a corrupted orphan linked list found. Fix? yes
Inode 68165509 was part of the orphaned inode list. FIXED.
Pass 2: Checking directory structure
Entry ‘clientinfo.34’ in /cache/twonkymedia/pdb/pdb_B4750E06D3D9 (7536995) has deleted/unused inode 7536702. Clear? yes
Entry ‘clientinfo.130’ in /cache/twonkymedia/pdb/pdb_B4750E06D3D9 (7536995) has deleted/unused inode 7536701. Clear? yes
Entry ‘clientinfo.40’ in /cache/twonkymedia/pdb/pdb_B4750E06D3D9 (7536995) has deleted/unused inode 7536698. Clear? yes
Entry ‘pdbindex’ in /cache/twonkymedia/pdb/pdb_B4750E06D3D9 (7536995) has deleted/unused inode 7536708. Clear? yes
Entry ‘clientinfo.7’ in /cache/twonkymedia/pdb/pdb_B4750E06D3D9 (7536995) has deleted/unused inode 7536746. Clear? yes
Entry ‘clientinfo.182’ in /cache/twonkymedia/pdb/pdb_B4750E06D3D9 (7536995) has deleted/unused inode 7538305. Clear? yes
Entry ‘clientinfo.58’ in /cache/twonkymedia/pdb/pdb_B4750E06D3D9 (7536995) has deleted/unused inode 7536729. Clear? yes
Entry ‘clientinfo.171’ in /cache/twonkymedia/pdb/pdb_B4750E06D3D9 (7536995) has deleted/unused inode 7536700. Clear? yes
Entry ‘clientinfo.125’ in /cache/twonkymedia/pdb/pdb_B4750E06D3D9 (7536995) has deleted/unused inode 7536709. Clear? yes
Entry ‘clientinfo.92’ in /cache/twonkymedia/pdb/pdb_B4750E06D3D9 (7536995) has deleted/unused inode 7536711. Clear? yes
Entry ‘clientinfo.167’ in /cache/twonkymedia/pdb/pdb_B4750E06D3D9 (7536995) has deleted/unused inode 7536745. Clear? yes
Entry ‘clientinfo.137’ in /cache/twonkymedia/pdb/pdb_B4750E06D3D9 (7536995) has deleted/unused inode 7538303. Clear? yes
Entry ‘clientinfo.135’ in /cache/twonkymedia/pdb/pdb_B4750E06D3D9 (7536995) has deleted/unused inode 7538304. Clear? yes
Entry ‘clientinfo.133’ in /cache/twonkymedia/pdb/pdb_B4750E06D3D9 (7536995) has deleted/unused inode 7536686. Clear? yes
Entry ‘clientinfo.41’ in /cache/twonkymedia/pdb/pdb_B4750E06D3D9 (7536995) has deleted/unused inode 7536744. Clear? yes
Entry ‘clientinfo.6’ in /cache/twonkymedia/pdb/pdb_B4750E06D3D9 (7536995) has deleted/unused inode 7538290. Clear? yes
Entry ‘clientinfo.173’ in /cache/twonkymedia/pdb/pdb_B4750E06D3D9 (7536995) has deleted/unused inode 7538306. Clear? yes
Pass 3: Checking directory connectivity
Pass 4: Checking reference counts
Unattached inode 7536721
Connect to /lost+found? yes
Inode 7536721 ref count is 2, should be 1. Fix? yes
Unattached inode 7536723
Connect to /lost+found? yes
Inode 7536723 ref count is 2, should be 1. Fix? yes
Unattached inode 7536726
Connect to /lost+found? yes
Inode 7536726 ref count is 2, should be 1. Fix? yes
Unattached inode 7536727
Connect to /lost+found? yes
Inode 7536727 ref count is 2, should be 1. Fix? yes
Unattached inode 7536981
Connect to /lost+found? yes
Inode 7536981 ref count is 2, should be 1. Fix? yes
Unattached inode 7536982
Connect to /lost+found? yes
Inode 7536982 ref count is 2, should be 1. Fix? yes
Unattached inode 7538312
Connect to /lost+found? yes
Inode 7538312 ref count is 2, should be 1. Fix? yes
Unattached inode 7538313
Connect to /lost+found? yes
Inode 7538313 ref count is 2, should be 1. Fix? yes
Unattached inode 7538314
Connect to /lost+found? yes
Inode 7538314 ref count is 2, should be 1. Fix? yes
Unattached inode 7538315
Connect to /lost+found? yes
Inode 7538315 ref count is 2, should be 1. Fix? yes
Unattached inode 7538316
Connect to /lost+found? yes
Inode 7538316 ref count is 2, should be 1. Fix? yes
Unattached inode 7538317
Connect to /lost+found? yes
Inode 7538317 ref count is 2, should be 1. Fix? yes
Unattached inode 7538318
Connect to /lost+found? yes
Inode 7538318 ref count is 2, should be 1. Fix? yes
Unattached inode 7538319
Connect to /lost+found? yes
Inode 7538319 ref count is 2, should be 1. Fix? yes
Unattached inode 7538320
Connect to /lost+found? yes
Inode 7538320 ref count is 2, should be 1. Fix? yes
Unattached inode 7538340
Connect to /lost+found? yes
Inode 7538340 ref count is 2, should be 1. Fix? yes
Inode 68157454 ref count is 16, should be 17. Fix? yes
Pass 5: Checking group summary information
Killed
SnowCloud:~# reboot
Hi Janeil and thanks for the guide!
Problem is I can’t get past step 3:
Error writing block 1 (Attempt to write block to filesystem resulted in short write). Ignore error?
After running # parted -l (step 2) I get this:
Model: ATA WDC WD20EFRX-68E (scsi)
Disk /dev/sda: 2000GB
Sector size (logical/physical): 512B/4096B
Partition Table: gpt
Number Start End Size File system Name Flags
3 15.7MB 528MB 513MB linux-swap(v1) primary
1 528MB 2576MB 2048MB ext3 primary raid
2 2576MB 4624MB 2048MB ext3 primary raid
5 4624MB 4724MB 99.6MB primary
6 4724MB 4824MB 101MB primary
7 4824MB 4826MB 1049kB primary
8 4826MB 4828MB 2097kB primary
4 4828MB 2000GB 1996GB primary
Model: Linux Software RAID Array (md)
Disk /dev/md0: 2048MB
Sector size (logical/physical): 512B/4096B
Partition Table: loop
Number Start End Size File system Flags
1 0.00B 2048MB 2048MB ext3
As you can tell, the file system on drive 4 isn’t specified.
Any clue what a solution to this can be?
Best regards!
Hi Oskar,
I’ll ponder this a short bit, but I can see the partition exists from the list. It’s highly possible that this is a symptom other people have come to me for with older models of the drive; 2TB drives have a different file system than the bigger ones, and the commands don’t work the same way. If I can come up with anything, I’ll get back to you as soon as I can.
Ok Janeil thanks a bunch.
That sounds plausible and I would very much appreciate it if you did find the magic command.
Have a nice weekend!
Hello – thank you for your tutorial. I’m struggling with step 2 – the parted command is ‘not found. Please could you advise?
login as: root
[email protected]‘s password:
BusyBox v1.20.2 (2014-10-30 15:28:59 CST) built-in shell (ash)
Enter ‘help’ for a list of built-in commands.
root@PlumFlix root # parted -l
-sh: parted: not found
root@PlumFlix root #
Thank you so much.
Hi Harrison,
Still working on this. You have a hard drive with a different formatting table than the one I used. I have not found the magic bullet yet (mainly due to not having a test bed to fool around with), but I hope to overcome this hurdle soon. You’re not the only one with this issue. Sit tight.
Hi Janeil,
Thank you for the article, I have similar WD drive, and it unfortunately failed even though it was connected to UPS. I got to Step #5 and drive completed the 5 passes of tests, but now I just see a row of “y”, it keeps scrolling down. I left it over night and it keeps going. Can you please advise me of what is it doing now? Can I restart PyTTY and then reboot?
Thank you,
Sergei
Hi Janeil,
I have an update. The PyTTY was stuck in unknown to me mode, it still scrolled the “y” continuously. I was fed up with it and wanted to take the drive apart and see if I can restore data other ways. After thinking about it I gave the reboot the device a try, I had to do the unplug/plug back in, but I am now able to access the data. Dashboard shows 3TB as free space, which is not correct.
Conclusion.
The steps worked perfectly, there were some hick-ups which were successfully resolved. I am very wary about using this drive again for anything else.
Thank you
Sergei
I too have the issue above don’t suppose you have had any luck? desperate to recover my data 🙂
I had the same problem “parted” not found.
I located the partiton with the command
cat /proc/partitions
For me, the storage is sda2:
root@WDMyCloud root # cat /proc/partitions
major minor #blocks name
7 0 94532 loop0
31 0 1024 mtdblock0
8 0 2930266584 sda
8 1 2097152 sda1
8 2 2921876935 sda2
8 3 1048576 sda3
8 4 1048576 sda4
8 5 1048576 sda5
8 6 2097152 sda6
8 7 1048576 sda7
9 0 2097088 md0
Step 3 workes for me:
mke2fs -n /dev/sda2
🙂 Thanky you for your nice work and guide 🙂
Hi I was excited to see the solution possibility but am stuck at e2fsck stage. For all the superblock numbers I am getting a message saying Superblock could NOT be read or does not describe correct ext2 filesystem ……
Hello,
This tutorial is for the WD My Cloud only. It does not work on the WD My Book Live models and/or an WD drives that are 2TB or smaller. The filesystem structure is different for these models.Someone had posted something awhile back and I’ll try to reference it, but that is why this tutorial doesn’t work for that. Sorry for the inconvenience.
BTW a bit more info – mine is WD NAS MyBookLive 2 TB
Dear Janeil,
I apologise if I disturb you with my question, I have tried the advises from your tutorial step by step, and I did not get any issues, however finishing the restart I got again the same problem – can not access the shares. I see them, but when I start to open them I get “Windows cannot access ..” I tried with different numbers from the superblock, but again nothing is happening. All the phases pass without errors, but at the end the drive don’t work.
Would you give me some advice what to do or try?
Thank you in advance!
Kind Regards,
Miro
Hi Miro,
Is the red light still on the drive? If it isn’t, the process worked and that issue is fixed. This may be something else network related with the drive.
When the process finished, do you remember if it said #killed?
-Janeil
[…] I had the aptitude for this in my early years, and it was this that helped me figure out that WD 004 solution. I’m way behind on what people do online and with software development, so I need to […]